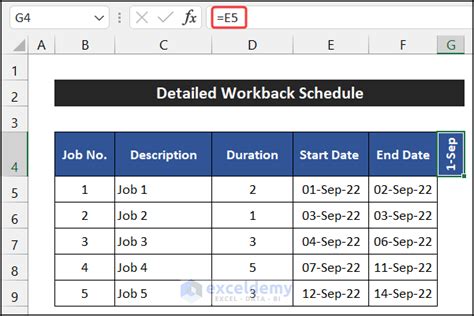
In today's fast-paced business world, effective project management is crucial for achieving success. One of the key tools used by project managers to plan and track progress is the workback schedule. A workback schedule is a timeline that outlines the specific tasks and deadlines required to complete a project. In this article, we will explore the concept of a workback schedule, its benefits, and how to create a workback schedule template in Excel.
What is a Workback Schedule?
A workback schedule is a project management tool that helps teams plan and manage the tasks required to complete a project. It is a reverse scheduling technique that starts with the final deadline and works backward to create a timeline of tasks and milestones. This approach ensures that all tasks are completed on time and that the project is delivered within the specified deadline.

Benefits of Using a Workback Schedule
Using a workback schedule offers several benefits to project managers and teams, including:
- Improved planning: A workback schedule helps teams plan and manage tasks more effectively, ensuring that all deadlines are met.
- Increased productivity: By prioritizing tasks and allocating resources effectively, teams can increase productivity and efficiency.
- Better risk management: A workback schedule helps identify potential risks and allows teams to develop mitigation strategies.
- Enhanced communication: A workback schedule provides a clear and transparent plan that can be shared with stakeholders, ensuring everyone is on the same page.
Creating a Workback Schedule Template in Excel
Creating a workback schedule template in Excel is a straightforward process that requires some basic knowledge of the software. Here's a step-by-step guide to creating a workback schedule template in Excel:
- Set up a new Excel spreadsheet: Open a new Excel spreadsheet and set up a table with the following columns: Task, Start Date, End Date, Duration, and Dependencies.
- Enter tasks and deadlines: Enter the tasks and deadlines for your project, starting with the final deadline and working backward.
- Calculate durations: Calculate the duration of each task by subtracting the start date from the end date.
- Identify dependencies: Identify any dependencies between tasks and note them in the Dependencies column.
- Create a Gantt chart: Use Excel's built-in Gantt chart feature to create a visual representation of your workback schedule.
Step-by-Step Guide to Creating a Workback Schedule Template in Excel
Here's a more detailed guide to creating a workback schedule template in Excel:
Step 1: Set up a new Excel spreadsheet
Open a new Excel spreadsheet and set up a table with the following columns: Task, Start Date, End Date, Duration, and Dependencies.
| Task | Start Date | End Date | Duration | Dependencies |
|---|---|---|---|---|
Step 2: Enter tasks and deadlines
Enter the tasks and deadlines for your project, starting with the final deadline and working backward.
| Task | Start Date | End Date | Duration | Dependencies |
|---|---|---|---|---|
| Task A | 2023-02-01 | 2023-02-05 | 4 days | |
| Task B | 2023-01-25 | 2023-01-31 | 6 days | Task A |
| Task C | 2023-01-18 | 2023-01-24 | 6 days | Task B |
Step 3: Calculate durations
Calculate the duration of each task by subtracting the start date from the end date.
| Task | Start Date | End Date | Duration | Dependencies |
|---|---|---|---|---|
| Task A | 2023-02-01 | 2023-02-05 | =END DATE-START DATE | |
| Task B | 2023-01-25 | 2023-01-31 | =END DATE-START DATE | Task A |
| Task C | 2023-01-18 | 2023-01-24 | =END DATE-START DATE | Task B |
Step 4: Identify dependencies
Identify any dependencies between tasks and note them in the Dependencies column.
| Task | Start Date | End Date | Duration | Dependencies |
|---|---|---|---|---|
| Task A | 2023-02-01 | 2023-02-05 | 4 days | |
| Task B | 2023-01-25 | 2023-01-31 | 6 days | Task A |
| Task C | 2023-01-18 | 2023-01-24 | 6 days | Task B |
Step 5: Create a Gantt chart
Use Excel's built-in Gantt chart feature to create a visual representation of your workback schedule.

Benefits of Using a Workback Schedule Template in Excel
Using a workback schedule template in Excel offers several benefits, including:
- Improved planning: A workback schedule template helps teams plan and manage tasks more effectively, ensuring that all deadlines are met.
- Increased productivity: By prioritizing tasks and allocating resources effectively, teams can increase productivity and efficiency.
- Better risk management: A workback schedule template helps identify potential risks and allows teams to develop mitigation strategies.
- Enhanced communication: A workback schedule template provides a clear and transparent plan that can be shared with stakeholders, ensuring everyone is on the same page.
Gallery of Workback Schedule Templates
Here are some examples of workback schedule templates:


Frequently Asked Questions
Here are some frequently asked questions about workback schedules:
What is a workback schedule?
+A workback schedule is a project management tool that helps teams plan and manage the tasks required to complete a project.
How do I create a workback schedule template in Excel?
+Creating a workback schedule template in Excel involves setting up a table with columns for tasks, start dates, end dates, durations, and dependencies.
What are the benefits of using a workback schedule template?
+Using a workback schedule template offers several benefits, including improved planning, increased productivity, better risk management, and enhanced communication.
In conclusion, a workback schedule is a powerful project management tool that helps teams plan and manage tasks more effectively. By creating a workback schedule template in Excel, teams can improve planning, increase productivity, and enhance communication. With its numerous benefits and ease of use, a workback schedule template is an essential tool for any project manager.
