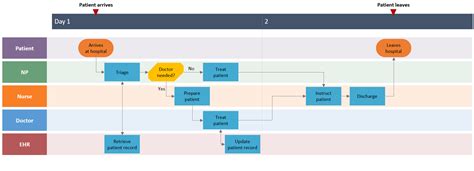
Creating a swim lane diagram template is an essential step in process improvement, project management, and organizational analysis. A swim lane diagram, also known as a cross-functional flowchart, is a visualization tool that maps out the steps and tasks involved in a process, assigning them to specific individuals, teams, or departments. By creating a swim lane diagram template, you can standardize your process mapping and make it easier to identify inefficiencies, streamline workflows, and improve communication across teams.
In this article, we will guide you through the 6 steps to create a swim lane diagram template, providing you with a comprehensive understanding of the process and the tools you need to get started.
Step 1: Define the Process and Identify the Swim Lanes

The first step in creating a swim lane diagram template is to define the process you want to map and identify the swim lanes. A swim lane represents a specific department, team, or individual responsible for a set of tasks or activities within the process. Start by brainstorming the different departments, teams, or individuals involved in the process and list them as potential swim lanes.
For example, if you're creating a swim lane diagram for an order fulfillment process, your swim lanes might include:
- Sales
- Customer Service
- Warehouse
- Shipping
- Finance
Step 2: Identify the Tasks and Activities

Once you have identified the swim lanes, it's time to identify the tasks and activities involved in the process. Start by brainstorming the different tasks and activities that take place within each swim lane. Ask yourself:
- What are the specific tasks and activities that need to be completed within each swim lane?
- How do the tasks and activities within each swim lane interact with each other?
- Are there any dependencies or handoffs between tasks and activities?
For example, within the Sales swim lane, tasks and activities might include:
- Receiving and processing customer orders
- Verifying customer information
- Updating order status
Step 3: Determine the Sequence of Tasks and Activities

With the tasks and activities identified, it's time to determine the sequence in which they occur. This involves arranging the tasks and activities in the order they take place, from start to finish. Consider the following:
- What is the starting point of the process?
- What are the intermediate steps and tasks?
- What is the end point of the process?
For example, within the Sales swim lane, the sequence of tasks and activities might be:
- Receive customer order
- Verify customer information
- Update order status
- Notify customer of order status
Step 4: Map the Tasks and Activities to the Swim Lanes

With the sequence of tasks and activities determined, it's time to map them to the swim lanes. This involves placing each task and activity within the corresponding swim lane. Consider the following:
- Which tasks and activities belong to each swim lane?
- How do the tasks and activities within each swim lane interact with each other?
- Are there any dependencies or handoffs between tasks and activities across swim lanes?
For example, within the Order Fulfillment process, the tasks and activities might be mapped to the swim lanes as follows:
- Sales swim lane:
- Receive customer order
- Verify customer information
- Update order status
- Warehouse swim lane:
- Pick and pack order
- Ship order
- Shipping swim lane:
- Deliver order to customer
Step 5: Refine and Finalize the Swim Lane Diagram Template

With the tasks and activities mapped to the swim lanes, it's time to refine and finalize the swim lane diagram template. Consider the following:
- Are there any unnecessary tasks or activities that can be eliminated?
- Are there any tasks or activities that can be combined or streamlined?
- Are there any dependencies or handoffs that need to be highlighted?
For example, within the Order Fulfillment process, the refined and finalized swim lane diagram template might include:
- Eliminating unnecessary tasks and activities
- Combining tasks and activities within swim lanes
- Highlighting dependencies and handoffs between swim lanes
Step 6: Review and Revise the Swim Lane Diagram Template

The final step in creating a swim lane diagram template is to review and revise it. Consider the following:
- Is the swim lane diagram template accurate and up-to-date?
- Are there any changes or updates that need to be made?
- Is the swim lane diagram template easy to understand and use?
For example, within the Order Fulfillment process, the revised swim lane diagram template might include:
- Updates to reflect changes in the process
- Improvements to the layout and design
- Additional documentation or support materials
Gallery of Swim Lane Diagram Templates:


FAQ Section:
What is a swim lane diagram template?
+A swim lane diagram template is a visualization tool used to map out the steps and tasks involved in a process, assigning them to specific individuals, teams, or departments.
What are the benefits of using a swim lane diagram template?
+The benefits of using a swim lane diagram template include improved process visualization, streamlined workflows, and enhanced communication across teams.
How do I create a swim lane diagram template?
+To create a swim lane diagram template, follow the 6 steps outlined in this article, including defining the process, identifying tasks and activities, determining the sequence, mapping tasks to swim lanes, refining and finalizing the template, and reviewing and revising the template.
We hope this article has provided you with a comprehensive understanding of how to create a swim lane diagram template. By following the 6 steps outlined in this article, you can create a template that helps you visualize and improve your processes, leading to increased efficiency and productivity.
